Build a Custom MCP Server to Query Supabase
In this tutorial, you’ll learn how to build a custom MCP server in Pochi that lets you run natural language SQL queries on your Supabase database. This lets you query your database directly from your code editor using everyday language, making complex SQL queries simple and intuitive.
This is a practical example of extending Pochi using the Model Context Protocol (MCP), and illustrates how teams can integrate AI into internal workflows for powerful, context-aware automation. This is particularly useful when you're debugging code, collaborating across teams, or building features that require quick access to live data (e.g: checking whether a migration seeded correctly, inspecting a table schema, or verifying specific column values).
Prerequisites
Before we start, you’ll need the following:
- Install Pochi
- Setup a Supabase Project
- OpenAI API Key (You can use any other LLM model if preferred.)
What is MCP (Model Context Protocol)?
MCP (Model Context Protocol) is a lightweight, flexible interface that allows large language models (LLMs) like those used in Pochi to connect and interact with external tools, APIs, or databases. In this tutorial, MCP acts as the bridge between your natural language queries and the Supabase database, enabling Pochi to translate plain English questions into SQL queries using OpenAI, execute them, and even generate visualizations using Vega Charts.
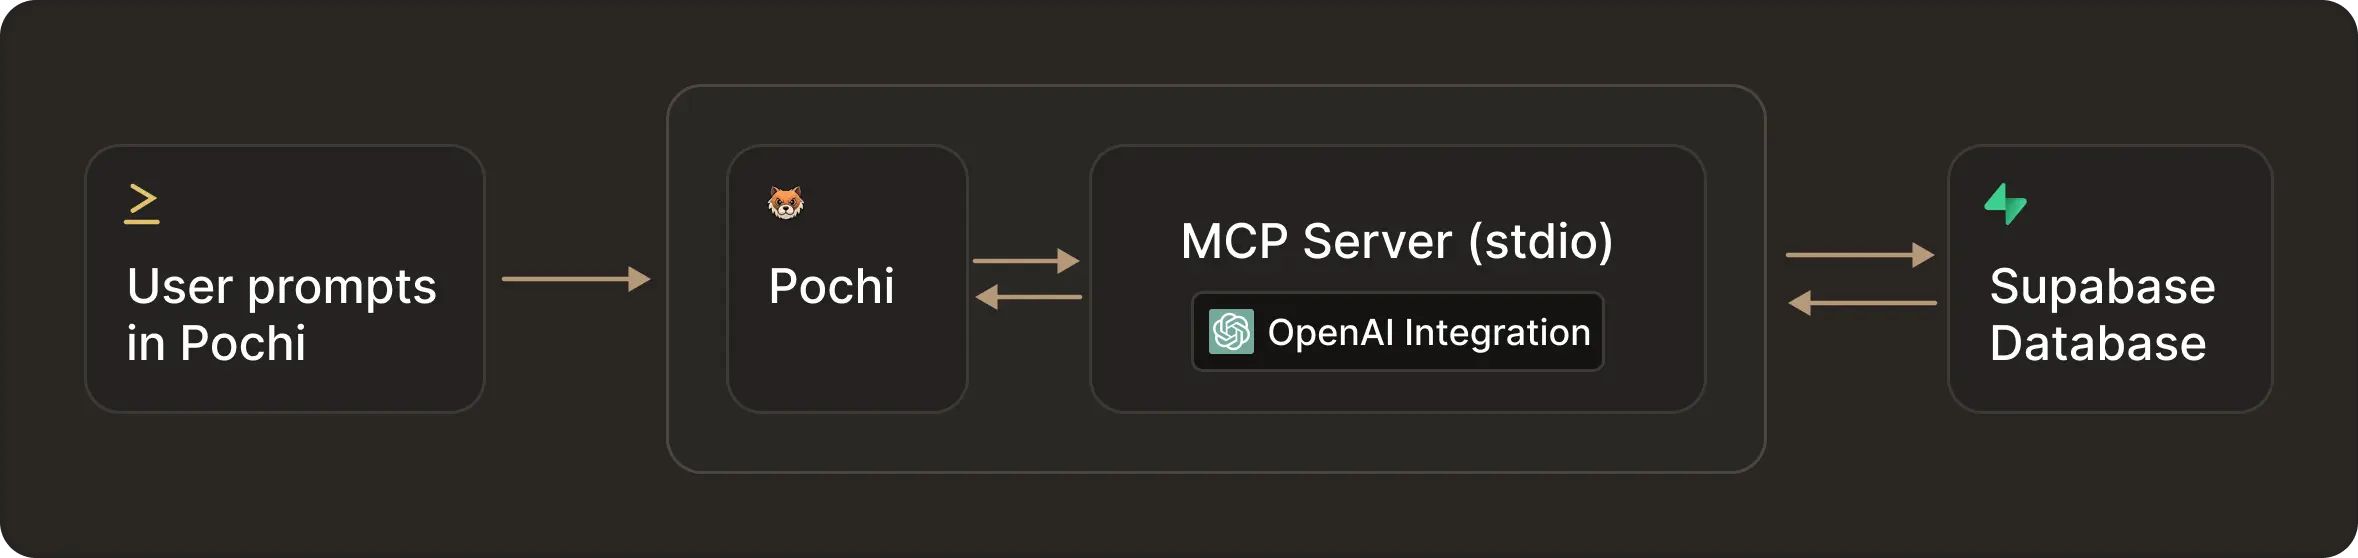
We’re going to use Supabase database and limit to read only queries, but you can always extend to perform CRUD operations too. Using MCP servers makes it easy to extend AI assistants with custom functionality and is a perfect way to keep your focus on coding while still getting the data context you need.
Getting Started: How to Build the MCP Server
Step 1: Setup your VS Code project
First, we’ll set up a new project inside VS Code. To do so, we’ll create a new folder and initialise a Node project.
mkdir supabase-mcp-server
cd supabase-mcp-server
npm init -y
The command npm init -y quickly creates a package.json file in your project directory using default values, without prompting you for configuration.
Once the project is setup, we need to install the required dependencies. Run the following command:
npm install @modelcontextprotocol/sdk zod openai dotenv @supabase/supabase-js@modelcontextprotocol/sdk– Provides tools to manage structured context and memory for LLMs.zod– Required to define schemas for input/output in the MCP SDK.openai– Used to interact with OpenAI’s language and image models.dotenv– Loads environment variables from a .env file into the app.@supabase/supabase-js– Enables database, auth, and storage operations with Supabase.
Create a .env file
The .env file is created to store your Supabase and OpenAI keys to avoid exposing them on the code side. You can fetch your Supabase API key by going to Settings -> API keys and creating a secret service role API key.

For the OpenAI key, go to your dashboard and API keys section where you can click +Create a secret key button on the top right corner.
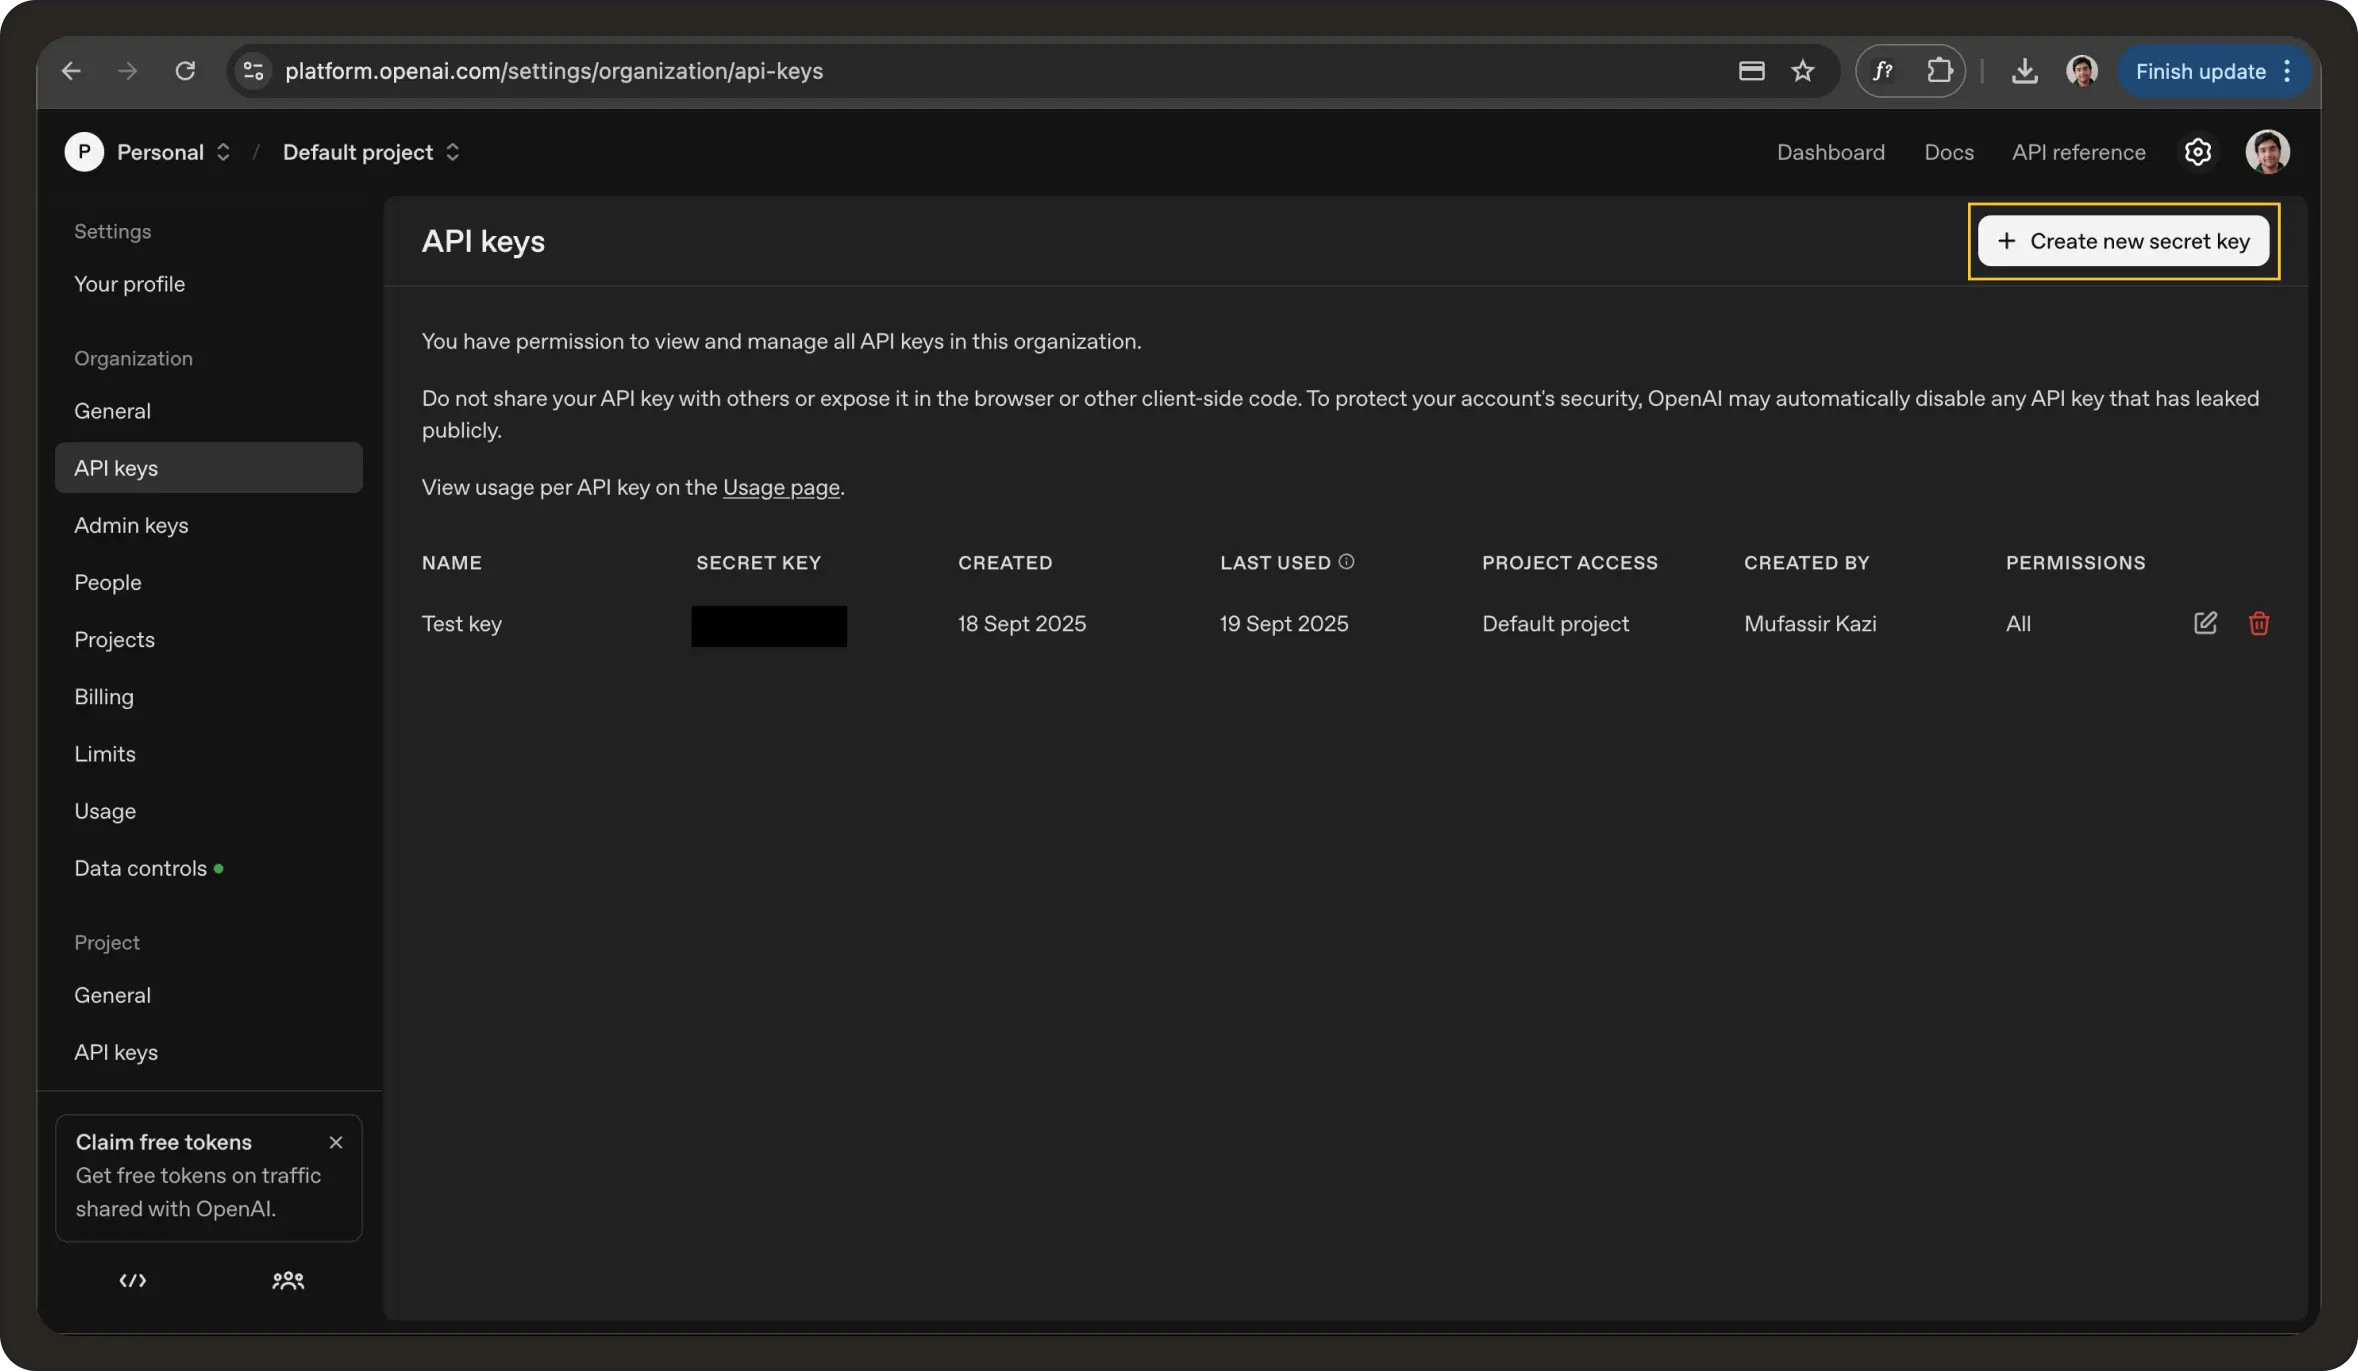
Paste these keys in the .env file as follows:
SUPABASE_URL=your-project-url
SUPABASE_SERVICE_ROLE_KEY=your-service-role-key
OPENAI_API_KEY=your-openai-api-key
Step 2: Create your Supabase Database
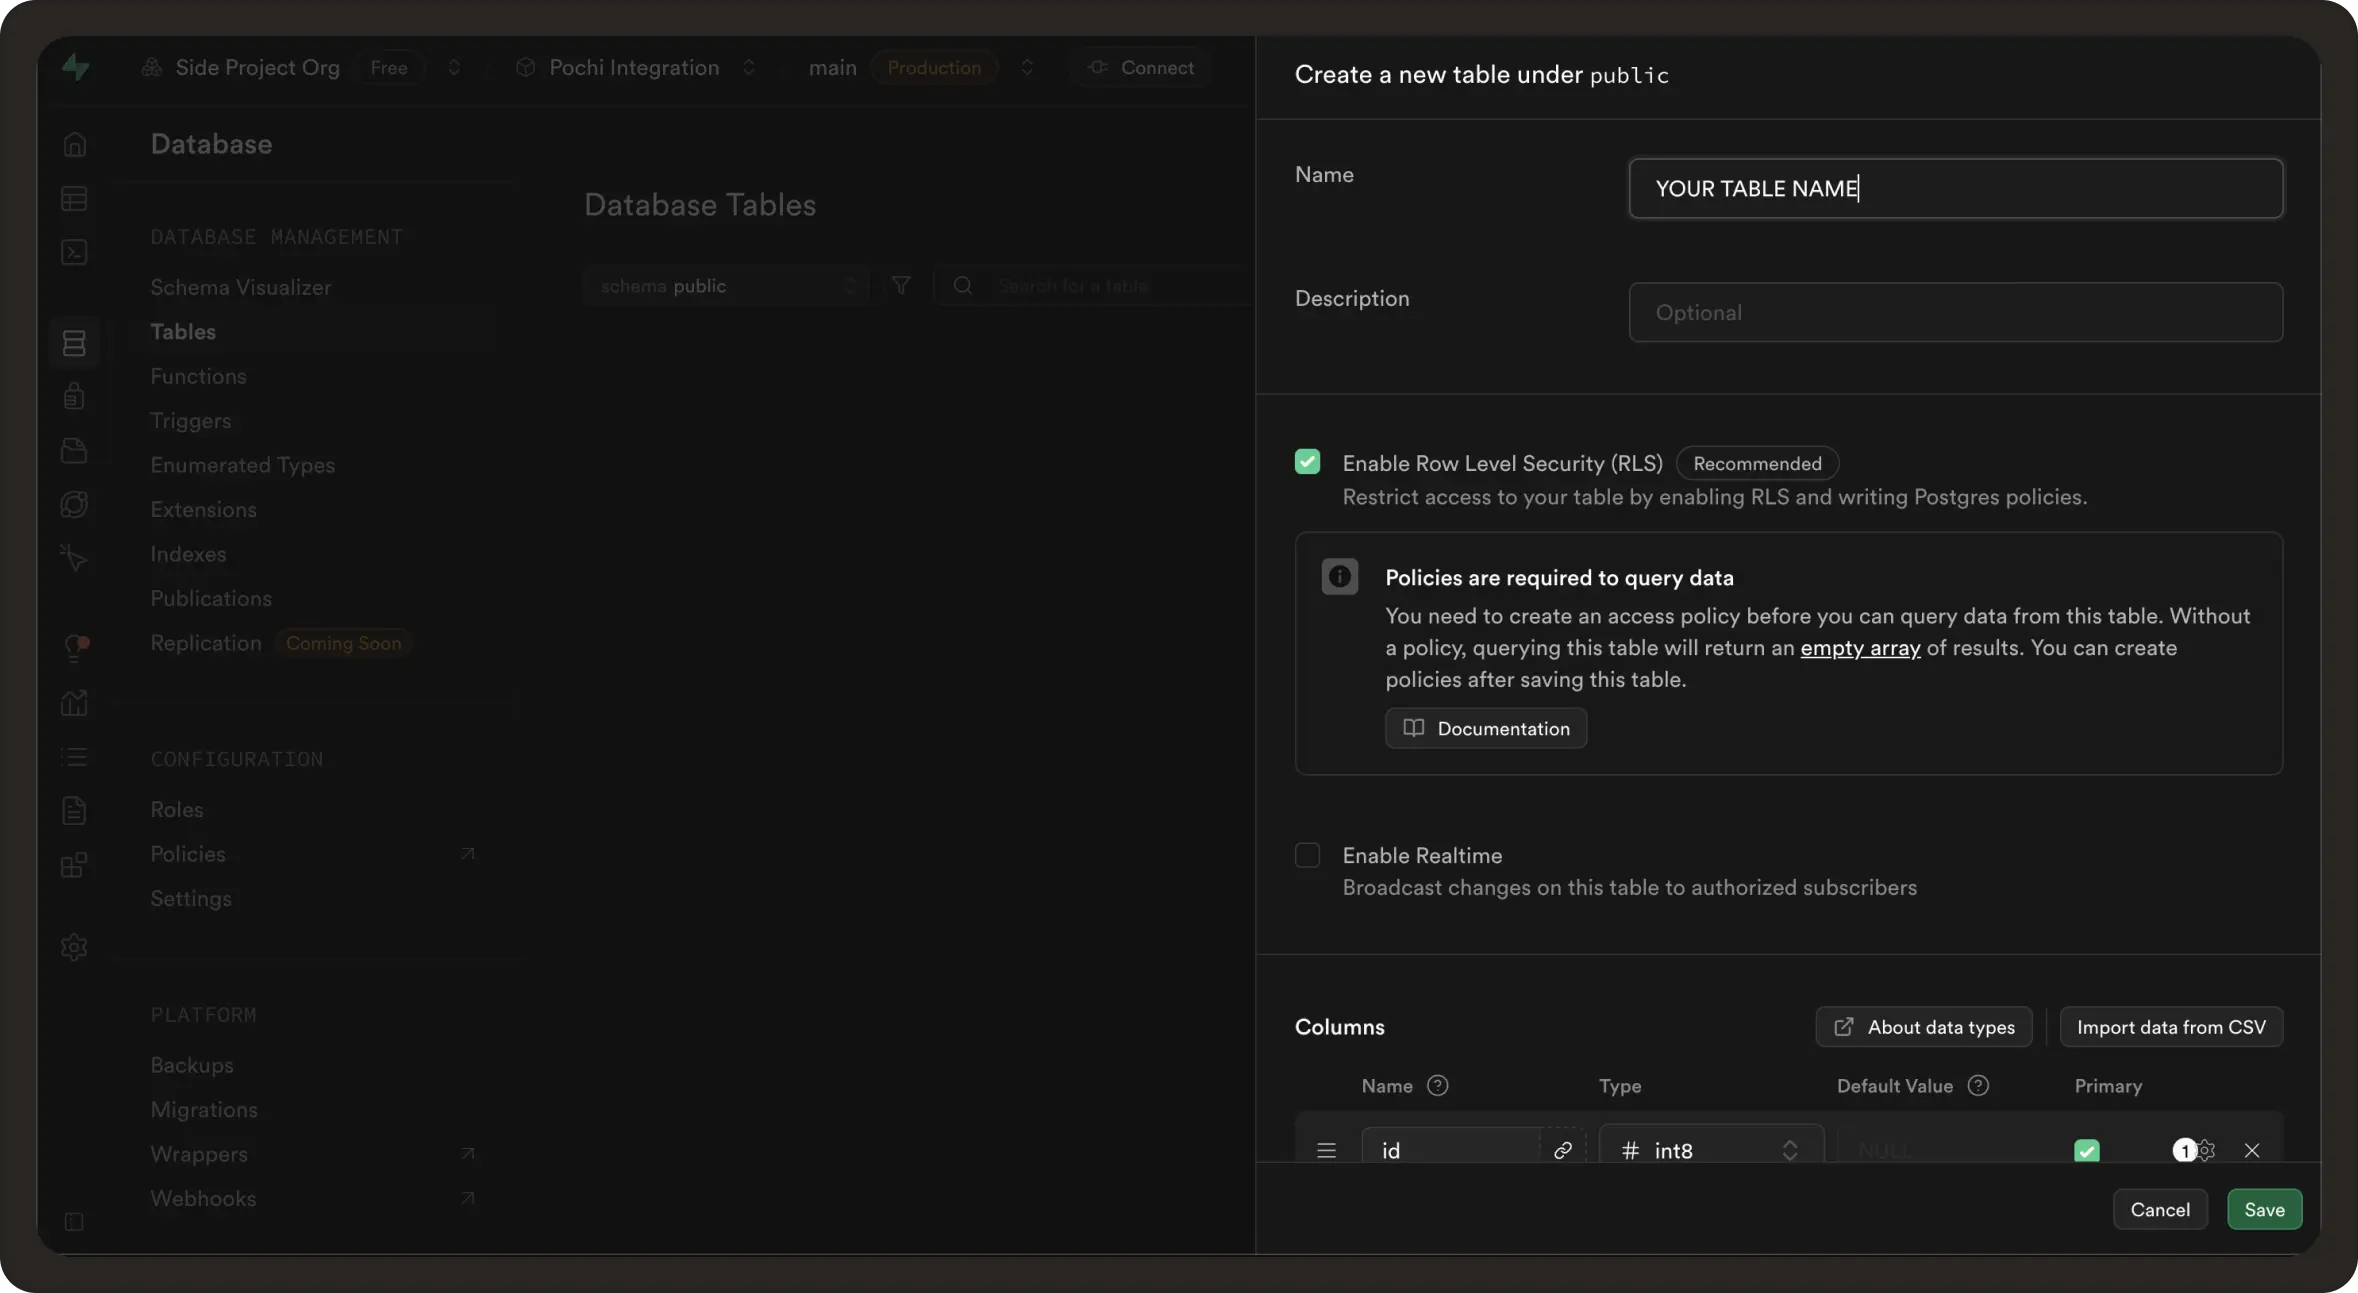
You can create a database table by going to Database -> Tables -> New Table. Add the relevant Name, Description and Column types you want or import via a CSV.
What we’ll do here instead is to open the SQL editor and create a database by running the below query:
CREATE TABLE IF NOT EXISTS sales_data (
id UUID PRIMARY KEY,
sale_date DATE NOT NULL,
region TEXT NOT NULL,
product TEXT NOT NULL,
sales_amount NUMERIC(12,2) NOT NULL,
quantity INTEGER NOT NULL
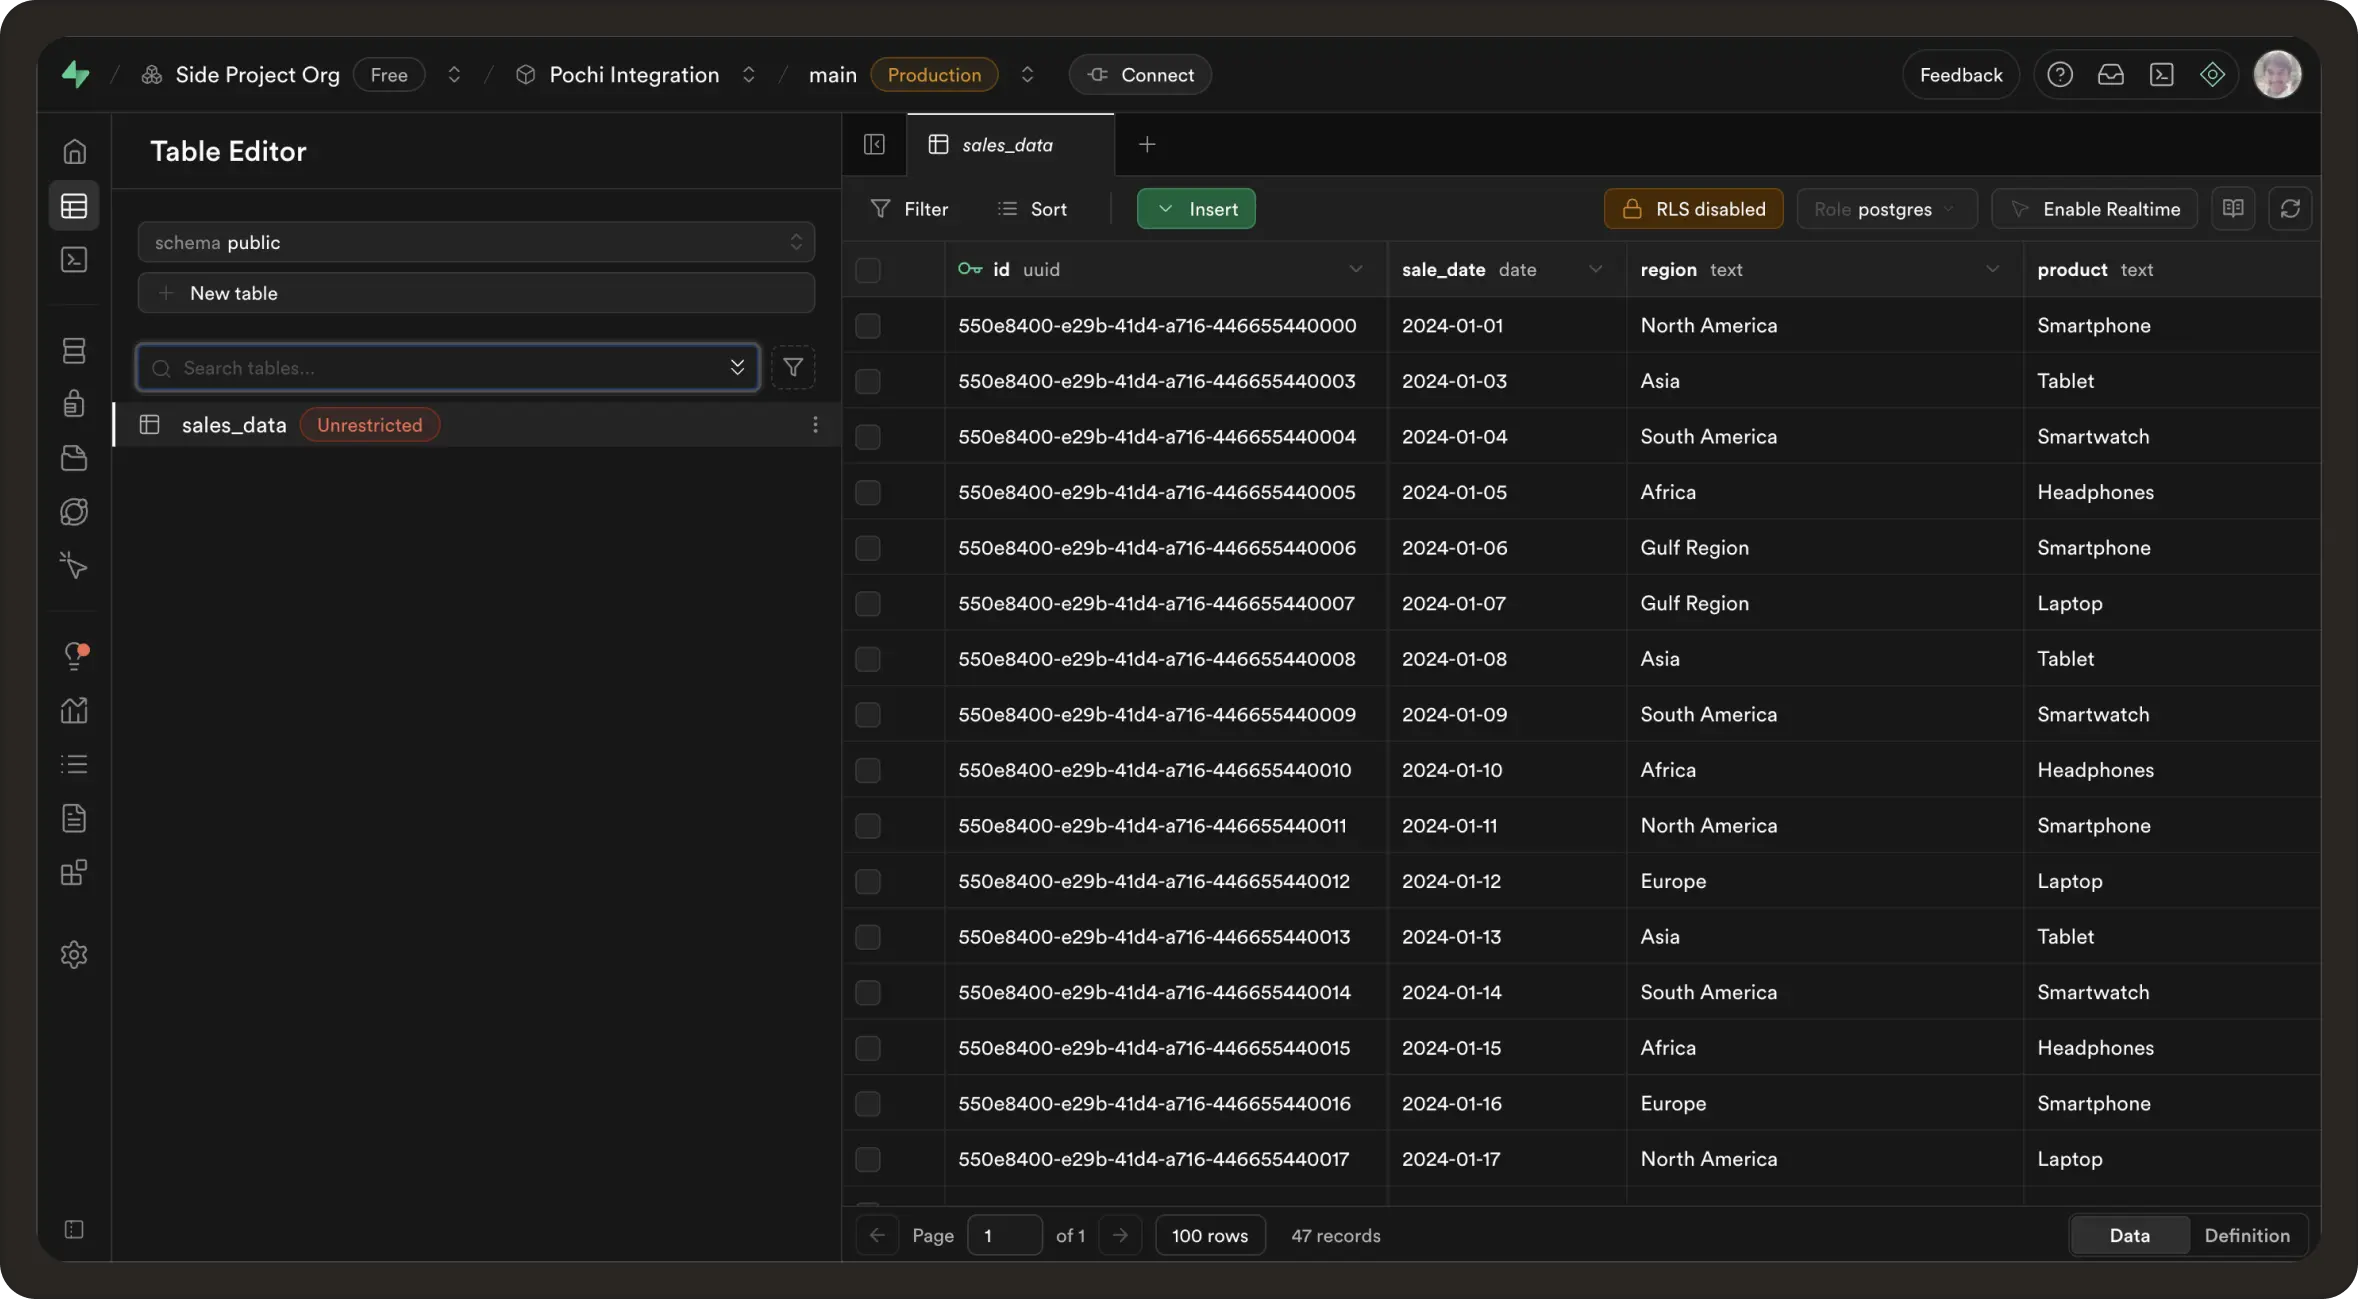
);This creates a sales_data table with columns for id, sale_date, region, product, sales_amount, and quantity. To insert values into this database you can again do it manually, or via SQL insertion as below:
INSERT INTO sales_data (id, sale_date, region, product, sales_amount, quantity) VALUES
('550e8400-e29b-41d4-a716-446655440000', '2024-01-01', 'North America', 'Smartphone', 120345.50, 350),
('550e8400-e29b-41d4-a716-446655440048', '2024-01-02', 'Europe', 'Laptop', 98000.00, 220),
('550e8400-e29b-41d4-a716-446655440003', '2024-01-03', 'Asia', 'Tablet', 45000.75, 180),
('550e8400-e29b-41d4-a716-446655440004', '2024-01-04', 'South America', 'Smartwatch', 25000.00, 90),
(Include the rest of your rows here)
This is how your database table will look:
Step 3: Prompt Pochi to build out the MCP server & Supabase Client
You can generate your MCP server in minutes by prompting Pochi to create the required files. Here’s a prompt you can use:
Create a new project for an MCP server that connects to Supabase. I need three files:
- `supabaseClient.js` for initializing the Supabase client using environment variables
- `index.js` for the MCP server with a queryDatabase tool that takes a plain-English question, translates it into SQL with OpenAI, runs it on Supabase, and outputs results and a Vega-Lite chart
- `.env` showing what env vars are needed.”

Transport
- Use `StdioServerTransport` from MCP SDK.
- The server must run as a subprocess and communicate with Pochi/Inspector via stdio.

Error Handling
- Always return `success: true|false`.
- On error, return `{ success: false, rows: [], error: "<message>" }`.
Here’s the generated supabaseClient.js file:
import { createClient } from "@supabase/supabase-js";
import dotenv from "dotenv";

dotenv.config();

const supabaseUrl = process.env.SUPABASE_URL;
const supabaseKey = process.env.SUPABASE_SERVICE_ROLE_KEY;

if (!supabaseKey) {
  console.error("❌ Missing SUPABASE_SERVICE_ROLE_KEY env var");
  throw new Error("SUPABASE_SERVICE_ROLE_KEY environment variable is required");
}

export const supabase = createClient(supabaseUrl, supabaseKey, {
  auth: { persistSession: false, autoRefreshToken: false },
  global: {
    headers: { "User-Agent": "mcp-supabase-server/1.0.0" },
  },
});
Note: Pochi comes with built-in support for various LLM providers. This grants flexibility, as not every model behaves the same way. Some are ideal for code generation, while some do logical reasoning better and often switching models is enough to break out of an error loop you might be stuck in.
There is also the option to “Bring Your Own Key” (BYOK), if you’re working on large codebases with a team that requires unlimited usage, wants to log and bill everything in their own OpenAI account, or if you need access to models beyond what Pochi provides by default. For this tutorial, we’ll stick with the default setup but you can read more about this here.
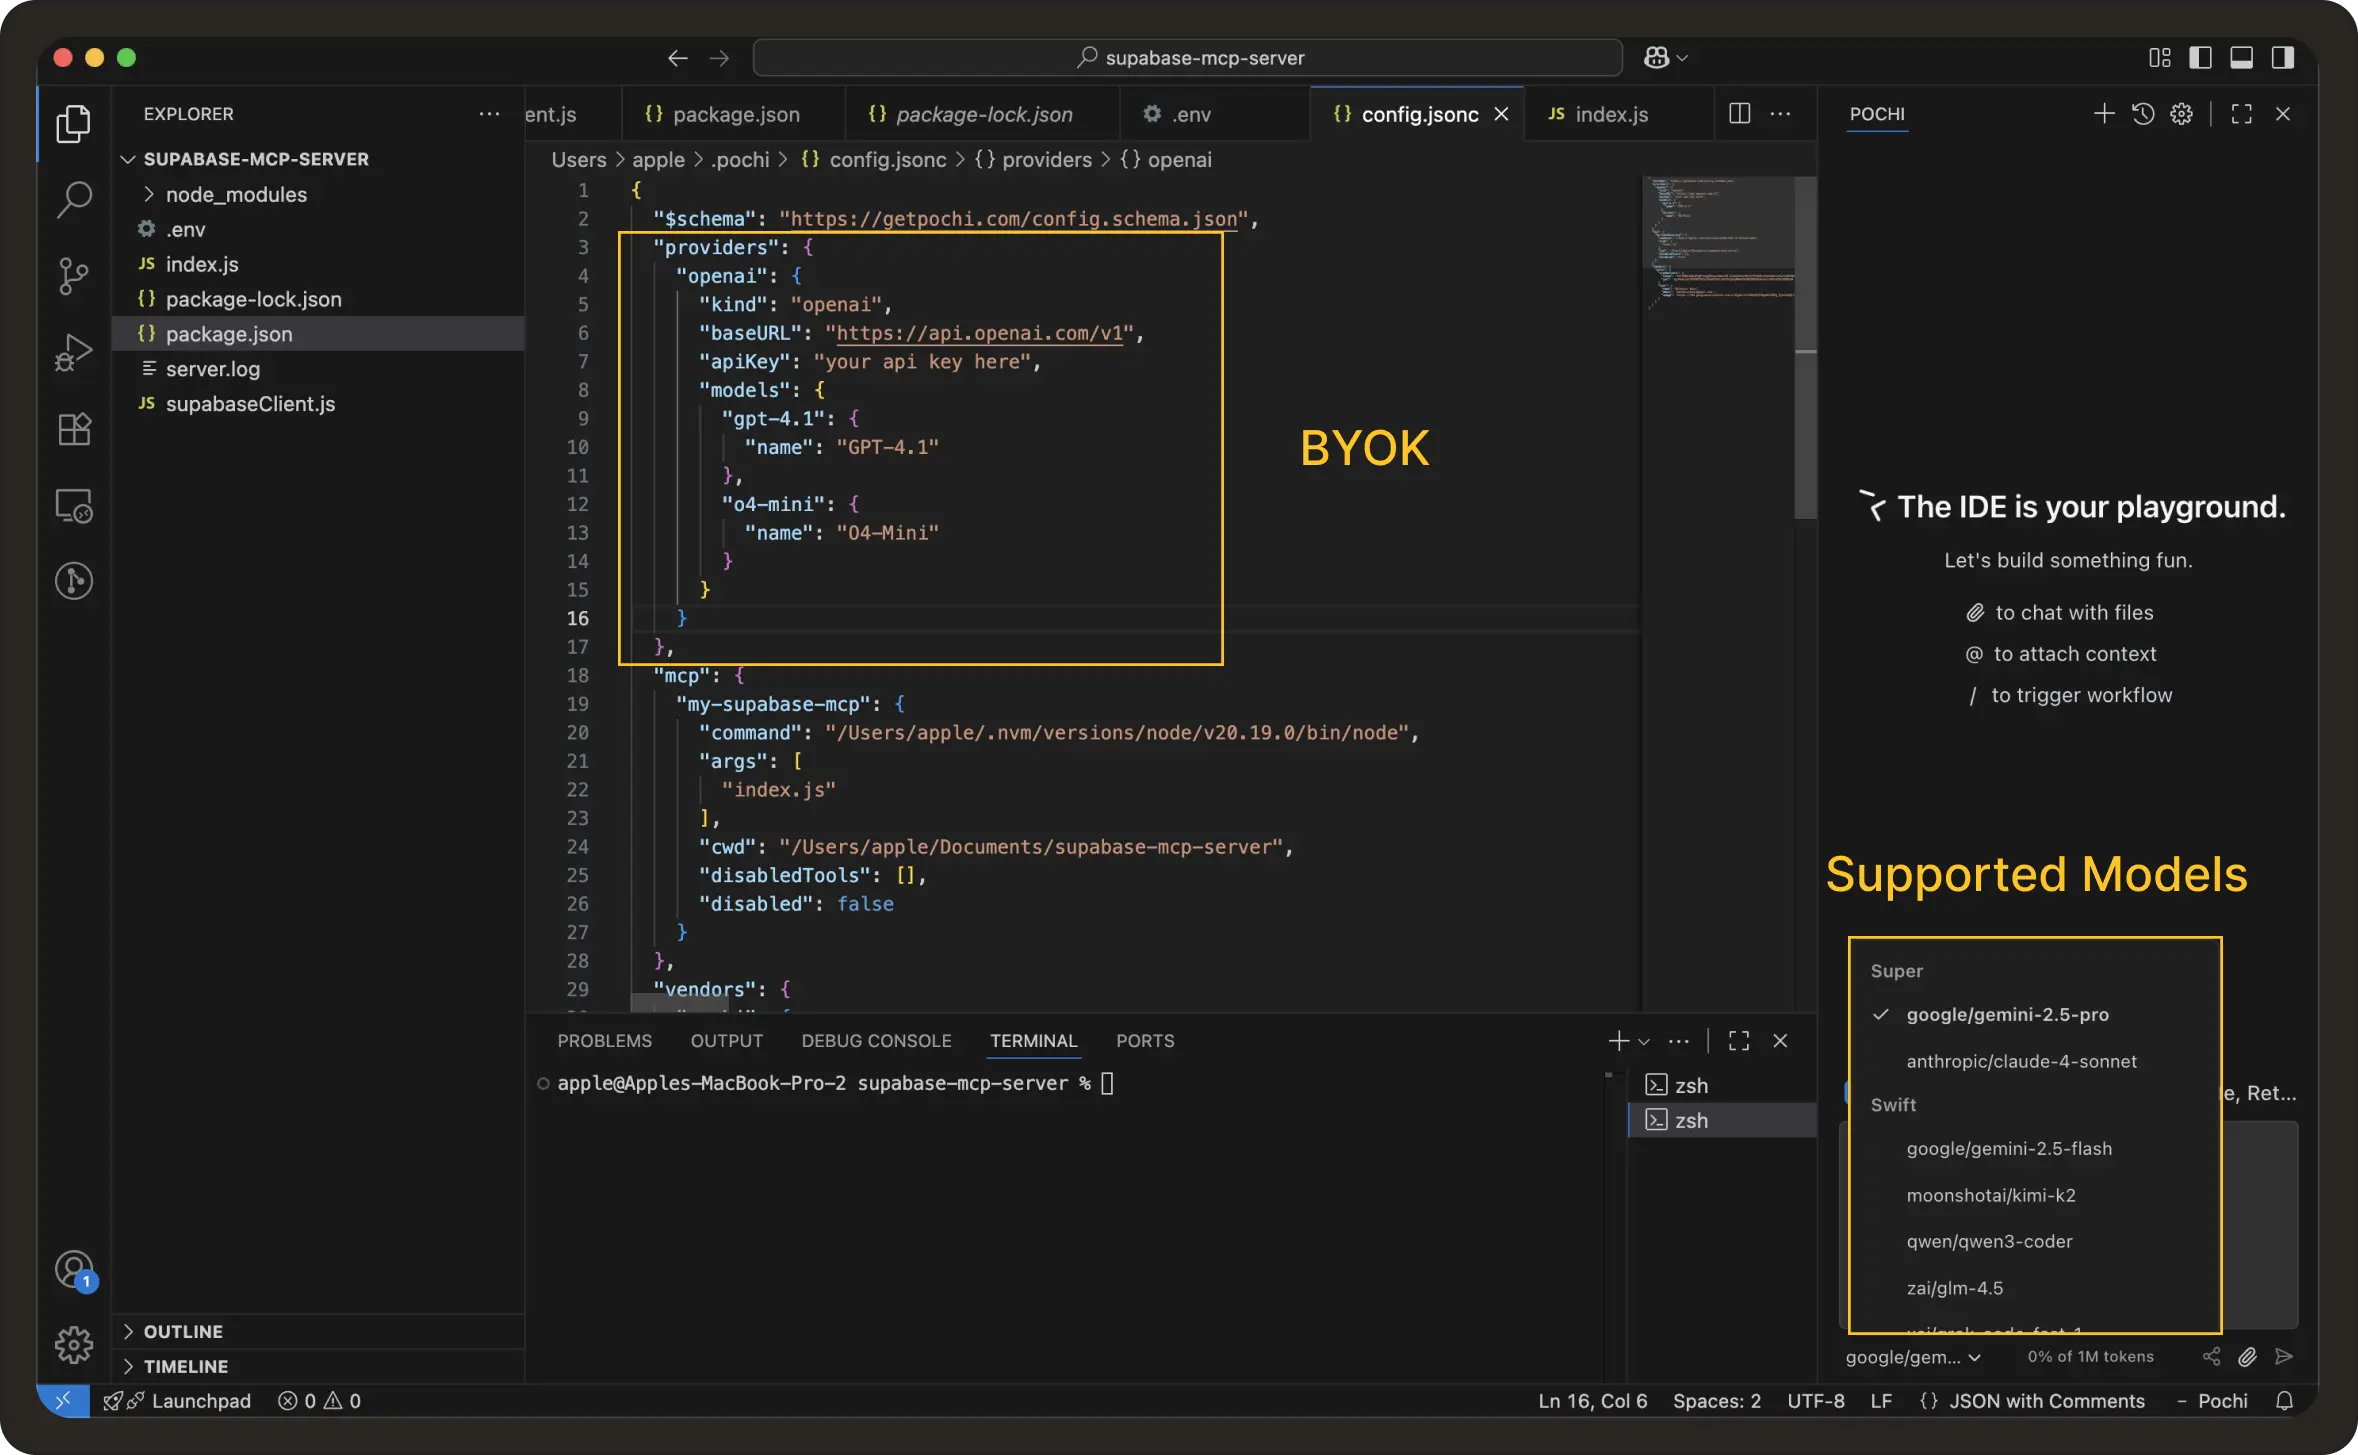
Also, It’s important to define your database schema in order for OpenAI to create the proper SQL queries. Otherwise, the SQL generated will keep referencing new table and column names which would fail with “No [database / column name] found" since they don’t exist.
In your prompt to Pochi you can define the database schema as such:
You must ONLY use this schema:
Table: sales_data
- id (uuid)
- sale_date (date)
- region (text)
- product (text)
- sales_amount (numeric)
- quantity (integer)
Here’s the complete index.js file that was generated:
import { McpServer } from "@modelcontextprotocol/sdk/server/mcp.js";
import { StdioServerTransport } from "@modelcontextprotocol/sdk/server/stdio.js";
import { supabase } from "./supabaseClient.js";
import { z } from "zod";
import OpenAI from "openai";
import dotenv from "dotenv";

dotenv.config();

const openai = new OpenAI({
  apiKey: process.env.OPENAI_API_KEY,
});

// Known schema description (from your DB)
const schemaDescription = `
You must ONLY use this schema:
Table: sales_data
- id (uuid)
- sale_date (date)
- region (text)
- product (text)
- sales_amount (numeric)
- quantity (integer)
`;

// Helper: build Vega-Lite spec automatically
function buildVegaLiteSpec(rows) {
  if (!rows || rows.length === 0) return null;
  const sample = rows[0];
  const keys = Object.keys(sample);

  let xKey = keys.find(
    (k) =>
      typeof sample[k] === "string" ||
      k.toLowerCase().includes("date") ||
      k.toLowerCase().includes("region") ||
      k.toLowerCase().includes("product")
  );
  let yKey = keys.find(
    (k) =>
      typeof sample[k] === "number" ||
      k.toLowerCase().includes("amount") ||
      k.toLowerCase().includes("quantity") ||
      k.toLowerCase().includes("total")
  );

  if (!xKey || !yKey) return null;

  return {
    $schema: "https://vega.github.io/schema/vega-lite/v5.json",
    description: `Auto-generated chart of ${yKey} by ${xKey}`,
    data: { values: rows },
    mark: "bar",
    encoding: {
      x: { field: xKey, type: "ordinal" },
      y: { field: yKey, type: "quantitative" },
    },
  };
}

// Create MCP server
const server = new McpServer({
  name: "supabase-mcp",
  version: "1.0.0",
});

// Tool: queryDatabase (Plain English → SQL → Supabase)
server.tool(
  "queryDatabase",
  {
    inputSchema: z.union([
      z.string(), // tolerate CLI sending plain string
      z.object({ question: z.string() }), // VS Code sends {question: "..."}
    ]),
    outputSchema: z.any(), // tolerate CLI sending "{}" as a string
  },
  async (input) => {
    try {
      let question = "";

      // 🔑 Normalize input from different runtimes
      if (typeof input === "string") {
        question = input;
      } else if (input?.question) {
        question = input.question;
      } else if (typeof input?.inputSchema === "string") {
        try {
          const parsed = JSON.parse(input.inputSchema);
          if (parsed.question) question = parsed.question;
        } catch {
          // ignore parse errors
        }
      } else if (input?.inputSchema?.question) {
        question = input.inputSchema.question;
      }

      if (!question.trim()) {
        return { success: false, rows: [], error: "No question provided" };
      }

      // 🚀 Translate English → SQL
      const completion = await openai.chat.completions.create({
        model: "gpt-4.1",
        messages: [
          {
            role: "system",
            content: `You are an assistant that translates plain English into SQL queries for PostgreSQL.
${schemaDescription}
⚠️ Important: Only use the table and columns listed above. Never invent names.`,
          },
          { role: "user", content: question },
        ],
        temperature: 0,
      });

      const sqlRaw = completion.choices[0].message.content.trim();
      console.error("Generated SQL (raw):", sqlRaw);

      const sqlMatch = sqlRaw.match(/```(?:sql)?\s*([\s\S]*?)\s*```/i);
      const sql = (sqlMatch ? sqlMatch[1] : sqlRaw).replace(/;$/, "").trim();

      console.error("Final SQL:", sql);

      if (!/^select/i.test(sql)) {
        return {
          success: false,
          rows: [],
          error: "Generated SQL is not a SELECT statement",
          sql,
        };
      }

      const { data, error } = await supabase.rpc("exec_sql", {
        sql_query: sql,
      });

      if (error) {
        return {
          success: false,
          rows: [],
          error: `SQL execution failed: ${error.message}`,
          sql,
        };
      }

      const rows = Array.isArray(data) ? data : [];
      const vega = buildVegaLiteSpec(rows);

      const content = vega
        ? [
            {
              type: "chart",
              format: "vega-lite",
              data: vega,
            },
          ]
        : [];

      return { success: true, rows, vega, content, sql };
    } catch (err) {
      return {
        success: false,
        rows: [],
        error: String(err.message || err),
      };
    }
  }
);

// Transport
const transport = new StdioServerTransport();

// Connect the server and handle potential errors
server.connect(transport).catch((error) => {
  console.error("Connection error:", error);
  process.exit(1);
});

process.on("SIGINT", () => process.exit(0));
process.on("SIGTERM", () => process.exit(0));

console.error("✅ Supabase MCP server running (STDIO, NL → SQL enabled)");
Writing the exec_sql function
In the index.js file, you’d notice the following code:
const { data, error } = await supabase.rpc("exec_sql", { sql_query });This allows your MCP server to send queries to Supabase. When the server calls the code above, it sends your generated SQL string to the exec_sql function in Supabase, which executes it on the server and returns the results as JSON
Now, Supabase does not support executing SQL directly through the client SDK. To make this work, we need to create an exec_sql RPC function in Supabase editor. Here’s the code you need to execute:
create or replace function exec_sql(sql text)
returns setof json as $$
begin
  return query execute sql;
end;
$$ language plpgsql;
Step 4: Configure Pochi to add your MCP server config
In your VS Code, press Command + Shift + P on Mac, or Ctrl + Shift + P on Windows and open the Pochi: Open MCP Server Settings. Here, you need to add your MCP server config. Initially it is empty:
“mcp": {}Paste this JSON snippet inside the existing MCP config :
"mcp": {
    "my-supabase-mcp": {
      "command": "/Users/apple/.nvm/versions/node/v20.19.0/bin/node",
      "args": [
        "index.js"
      ],
      "cwd": "/Users/apple/Documents/supabase-mcp-server"
    }
  }
The above code snippet will register a local MCP server in Pochi.
command= This is the path to the Node.js executable you want to use.args= The actual MCP server package or script to run (which we will generate in Step 6)cwd= The current working directory where the command will run.
When you save this config in the ~/config.json file, Pochi will know to launch node index.js as a subprocess and communicate with it via stdio transport when the “my-supabase-mcp” server is enabled. Read more about it here.
Step 5: Testing the MCP Server
Now that our server is created, we can test it using the MCP Inspector. The inspector is a way to verify the tools and resources exposed by the server work as expected. To do that first we install the MCP Inspector
npm install @modelcontextprotocol/inspectorThen you need to run your MCP server in Inspector:
npx @modelcontextprotocol/inspector node index.js(make sure you’re in your project folder, in this case: supabase-mcp-server).
Open the Inspector in your browser (it launches a local port).
- You’ll see a UI showing your server name (`supabase-mcp``).
- Under “Tools” you should see `querySupabaseSQL``.
- Click it, pass in your input:
{"question":"What are the total sales of each product by region?"}You should see the correct response which includes the Supabase database query result and a Vega Lite JSON spec.
Enable your MCP server
Now that your MCP server is verified, you can enable it inside Pochi to use it in your editor’s natural language chat UI. For that, we need to go to Pochi’s Tools Settings page (you can also find it via Command Palette: Pochi: Open Tools Settings)
Look for the MCP server named my-supabase-mcp and toggle it ON (enabled). You should see a green dot to indicate its connected.
Step 6: Executing the MCP server in Pochi
Once it works in Inspector, we can connect it into Pochi (our config already points to index.js). Then when you give Pochi a natural language prompt, asking the model to call queryDatabase tool, it will answer all your database related queries easily.
Prompt used:
Use the
queryDatabasetool to find out what are the total sales for each product by region
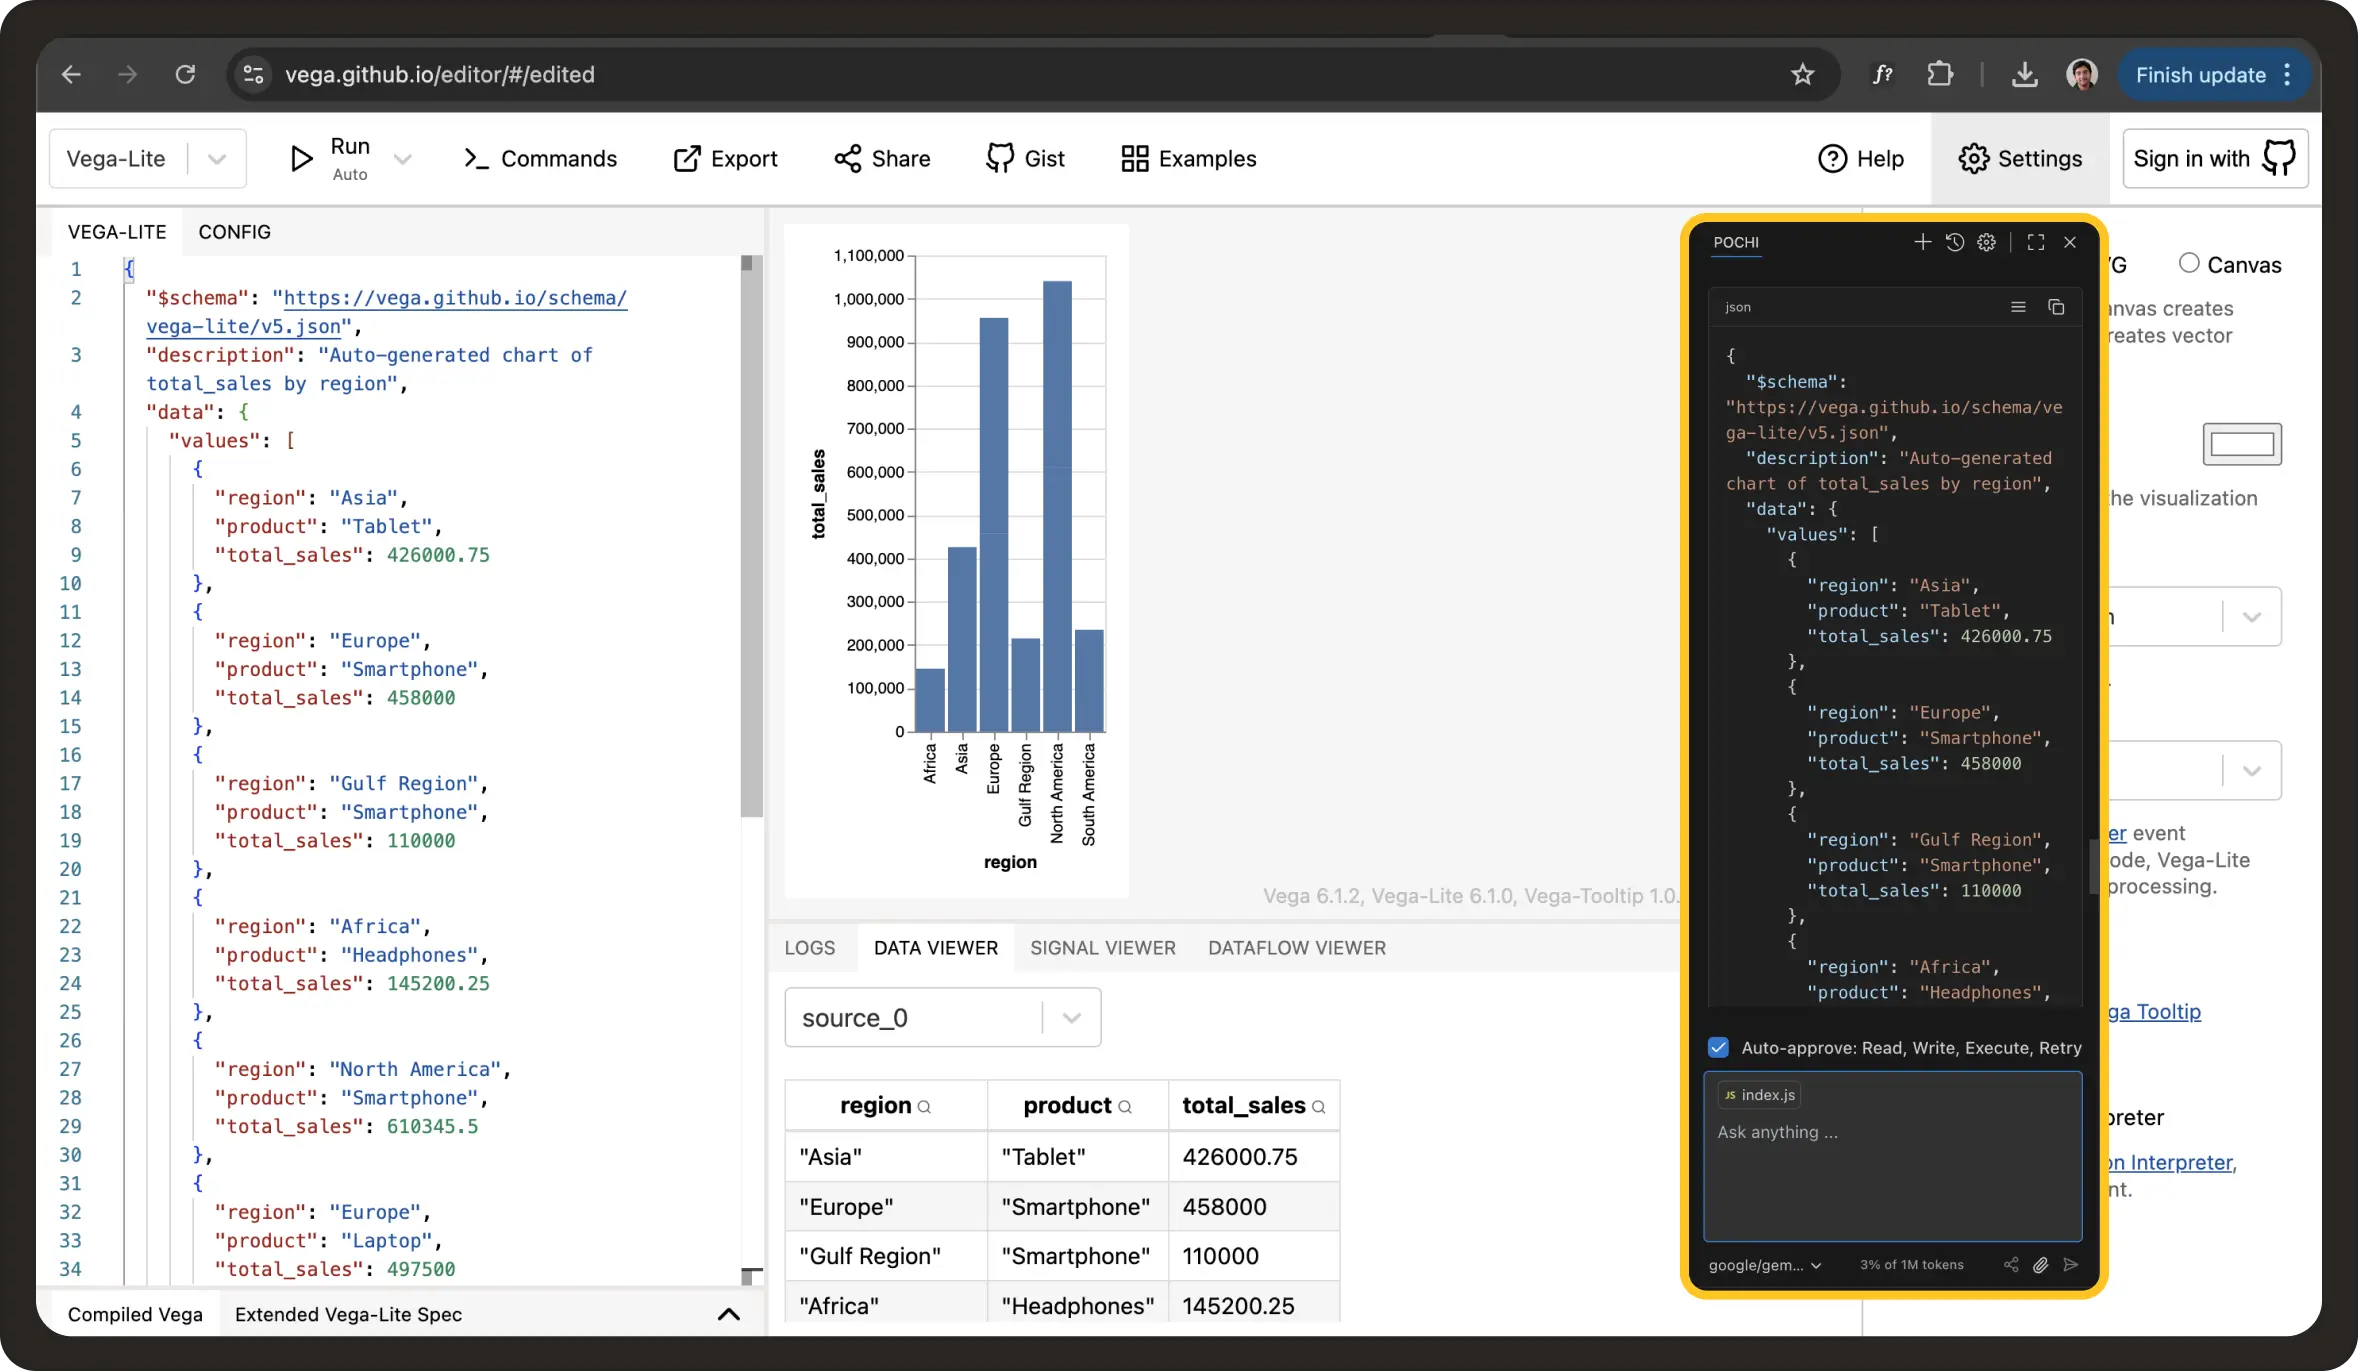
Here’s the final working demo:
You can also paste in the Vega - Lite JSON spec you receive in response into the Vega Editor and get a chart response of the requested query:
Step 7 (Optional): Using the MCP Server with Pochi CLI
So far, we’ve tested our Supabase MCP server in the Inspector, wired it into the Pochi VS Code extension, and also tested via the Pochi chat UI. But Pochi also provides a CLI client that can connect to MCP servers directly from your terminal.
This means you can query your database without opening VS Code at all:
pochi -p "What are the total sales for Europe region?"Behind the scenes, the Pochi CLI works the same way as the VS Code extension: it connects to your MCP server via stdio, calls the queryDatabase tool, and streams the results back into your terminal.
Invoking via the CLI helps if you spend most of your time in the shell or on remote servers. It also works great over SSH, in Docker containers, or CI/CD pipelines where you don’t have an editor UI. Moreover, you can use in automation workflows by wrapping pochi -p commands in scripts to periodically check metrics.
Conclusion: Improving Developer Workflow for Teams and Enterprises
Whether you're querying user logs, verifying migrations, or building internal dashboards, MCP lets you build custom servers that connect Pochi to your unique internal tools and workflows. This Supabase MCP server is just one example of how Pochi’s powerful extensibility can help your team stay in flow, access real-time context, and reduce the friction of internal data access.
Now that you’ve seen what’s possible, here are a few ways to take your project further:
- Deploy your MCP server with HTTP Transport: Instead of running locally via stdio, you can deploy your server over HTTP. This enables multiple team members. from developers to engineering managers, to securely access the same database instance through Pochi, with proper access controls, rate limiting, and centralized schema management. Learn more
- Expand beyond read-only queries: This tutorial focused on read-only queries for simplicity, but you can extend your MCP server to support full CRUD operations, allowing your natural language interface to create, update, and delete records as well.
- Customize and optimize prompts: Experiment with prompt design for OpenAI to improve SQL accuracy or add support for additional data visualizations beyond Vega Lite charts.
- Contribute and share: If you built something cool or want to see tutorials on related topics, such as CRUD operations or deployment best practices, please reach out by using
/create-issue commandwithin the Pochi VS Code extension or contribute to the project!